

We invite you to elevate your play with a clear plan and steady habits. A few years ago, one of our club members missed a match-winning throw because his stance wavered. That moment sparked a team-wide focus on fundamentals.
From that day, we built simple drills to sharpen throwing darts and sharpen the mind. Each session targeted grip, balance, and the small motion that sends a dart true.
Whether you are new or chasing a personal best, this guide breaks the sport into doable steps. We cover a reliable stance, a repeatable grip, and the physics behind each throw so you can control the flight of every dart.
Join us as we pair expert insight with practical practice. You will learn methods to build consistency, confidence, and measurable progress in every game.
Key Takeaways
- Master a repeatable stance to stabilize each throw.
- Refine your grip to improve dart flight and accuracy.
- Use simple drills to make throwing darts a habit.
- Understand the basic physics of the dart for smarter adjustments.
- Practice with purpose to build consistency and confidence.
Understanding the Darts Environment
Setting a consistent playing space is the first step to reliable throws. We create a repeatable setup so you can measure progress and train at a professional level.
Throw Line Distance
The throw line sits exactly 244 cm from the point on the floor directly below the board. This mark is the official boundary.
Every dart must start from behind this line. Standing on the line changes your arc and power, so respect the boundary for fair play.
Board Height
Mount the board so the center of the bull is 173 cm above the floor. That height standardizes sightlines and makes practice consistent for all players.
Keep the floor clear around the line. A stable stance needs space and confidence to deliver repeatable results.
“Consistency in setup equals consistency in score.”
- 244 cm = throw line distance from floor point below board.
- 173 cm = center of bull height from floor.
- Clear floor space ensures stable stance and safe play.
| Element | Measurement | Why it matters |
|---|---|---|
| Throw line | 244 cm | Defines legal throwing position and repeatability |
| Bull center | 173 cm | Standardizes visual reference across venues |
| Floor space | Clear and level | Provides safe stance and consistent foot placement |
Mastering Your Darts Technique
When movement and intent align, each dart you release becomes more predictable and precise. We teach a clear chain of motion so you can repeat success under pressure.
Focus on the synergy between your hand, wrist, and elbow. Small, consistent adjustments in those three links change the arc and landing zone more than force does.
Analyze one throw at a time. Record your stance and motion, then make tiny changes to grip, wrist angle, or elbow path. Repeat until the change becomes natural.
Every dart is an extension of intent. Treat practice as deliberate work: plan the throw, execute with calm, then note the result.
- Break the throw into three parts: setup, motion, release.
- Make micro-adjustments and track outcomes.
- Turn practiced motions into muscle memory so you can focus on strategy.
We aim to give you professional insights that scale with your goals. Daily focus on these elements leads to steadier scores and stronger confidence at the oche.
Selecting the Right Stance
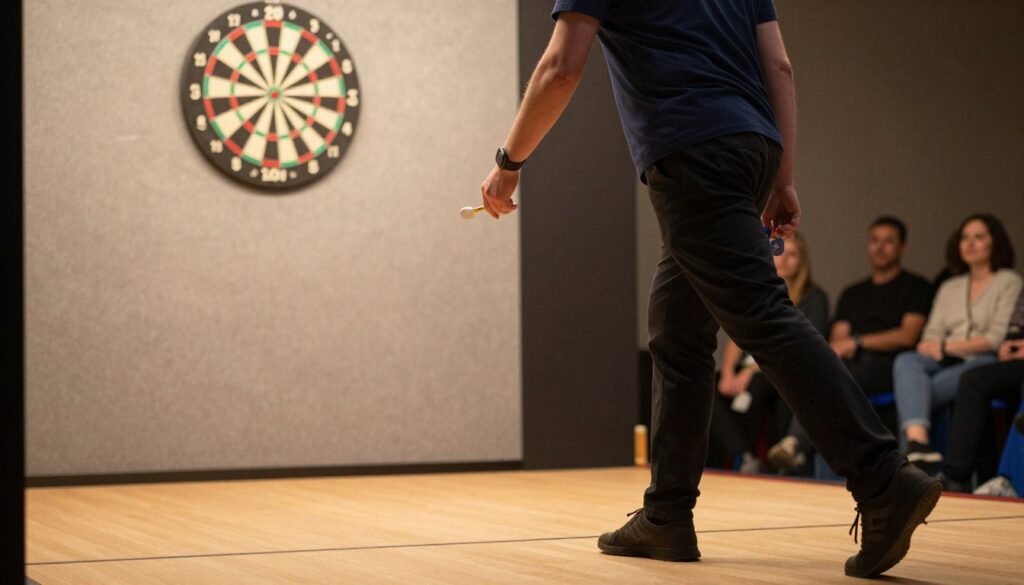
How you stand at the line shapes balance, angle, and the way the dart flies. A steady stance reduces wasted motion and builds repeatable results every time you step up to the board.
Middle Stance
The middle stance places your body diagonally to the board. This distributes weight across both feet and centers your balance.
Many players find this style comfortable because it lets the arm move freely while the feet stay planted on the floor.
Closed Stance
The closed, or side, stance has the front foot on the throw line and the body turned sideways. It gives a stable base and often improves accuracy.
This position locks your hips and helps maintain a consistent angle toward the board.
Open Stance
The open stance faces the board more squarely. It can limit forward leaning but suits players who prefer a direct line of sight.
Whichever style you choose, keep your feet set, your weight balanced, and your body still. Practice the same position multiple times to build true consistency and steady scores.
- Foundation: Your stance is the base of every game.
- Practice: Repeat the same foot placement and posture at least several times each session.
- Alignment: Proper feet and body position preserve angle and improve accuracy.
Perfecting Your Grip
Fine-tuning how you hold the barrel turns guessing into repeatable performance.
Find the balance point on the barrel first. Support that point lightly with thumb and finger so the dart stays level in your hand.
Three-finger grip: rest the index on top of the barrel and use the thumb beneath for support. This is simple and stable for many players.
Four-finger grip: use both index and middle fingers to locate the best spot on the barrel, with the thumb steadying below. This gives extra control for subtle releases.
- Keep a light hold so your fingers don’t introduce tension.
- Avoid touching the flight or the tip; the barrel is where you want contact.
- Experiment with small finger shifts to find the spot that feels natural.
| Grip Style | Finger Placement | Primary Benefit |
|---|---|---|
| Three-finger | Index on barrel, thumb under | Simple, stable, consistent release |
| Four-finger | Index + middle on barrel, thumb under | More control, finer adjustments |
| Light touch | Minimal pressure across fingers | Reduced tension, smoother flight |
We encourage you to test holds in short sessions. Track what feels stable and repeat that hold in drills. Your grip is personal; refine it until it becomes your reliable way to deliver the dart.
Aiming and Alignment
A reliable aim is built when your posture, sight, and intent form one straight path. Proper alignment lets your brain judge distance and motion with less guesswork.
Begin by finding your dominant eye and keeping both eyes open as you focus on the target. This preserves depth perception while your dominant eye leads the visual line.
Dominant Eye Usage
We recommend aligning your stance so a direct line runs from your dominant eye through your elbow to the board. That straight line helps the hand follow the intended path.
If a dart consistently misses the target, inspect your elbow and feet—small misalignments shift where the dart lands. Visualize the dart’s path before you move; mental rehearsal sharpens execution.
“When gaze and posture match, hitting the board becomes a matter of repetition, not luck.”
- Keep both eyes open for better depth cues.
- Lock your dominant eye on a single micro-target.
- Check that elbow points at the board to preserve alignment.
The Mechanics of the Throw
We focus on a hinge-style motion: keep the elbow steady and let the arm sweep like a folding fan. This creates a repeatable path from take back to release and into the follow through.
Start with your stance and shift a little weight onto your front foot. That small transfer gives a solid base for the arm to move and keeps the body still during the action.

Keep your hand and wrist relaxed. A loose wrist allows a natural snap at release that adds speed without forcing the dart.
- The throw depends on a stable body and fluid motion from the elbow and wrist.
- Fix your elbow; let the arm fold. Avoid jerky or forced movement.
- Maintain balance and minimal weight shift for consistency.
“When the elbow acts as a hinge and the arm moves smoothly, accuracy follows from repetition.”
| Phase | Key Action | Why it matters |
|---|---|---|
| Take back | Controlled rearward arc from elbow | Sets rhythm and stores potential energy |
| Release | Relaxed hand, quick wrist snap | Delivers speed and stabilizes flight |
| Follow through | Arm finishes forward in a fan arc | Ensures consistent line and reduces variance |
Mastering these mechanics takes time. Practice the three-step sequence slowly, then speed it up while keeping form. Over time, your dart flight becomes more predictable and your scores improve.
Refining Your Release and Follow Through
We treat the end of the throw as a precision routine. A controlled finish stabilizes the flight and makes the result repeatable. Train the final arc of your arm so each attempt moves toward the same point on the board.
The Take Back
Draw the dart back smoothly with the palm facing up. This position reduces wrist strain and keeps the wrist loose for a clean snap.
Keep the elbow steady and let the arm hinge; avoid pulling with the shoulder. A calm take back sets timing for the release and prevents rushed movement.
The Follow Through
The release should feel like sending a paper plane. Let all fingers let go at the same moment so the barrel leaves the hand cleanly.
After you release dart, extend the arm forward and point your fingertips at the target. A full follow through locks the movement and helps with long-term accuracy.
- Draw back smoothly with palm up to protect the wrist.
- Release with all fingers together to keep the flight stable.
- Finish by extending the arm and pointing at the target on the board.
- Keep the elbow steady so the arm movement repeats over time.
“A confident release and complete follow through turn practice into dependable performance.”
We recommend practicing this three-part sequence slowly, then increasing speed. Over time you will release dart with more confidence and less guesswork.
Building Consistency Through Practice
Treat practice as a system: set a regular time, pick targets, and track progress each session. Short, focused sessions of 30–60 minutes work better than irregular marathon days. We suggest daily work where possible.
Vary your training by mixing focused drills and real games. Play against different players to learn new rhythms and pressure handling. Aim at varied zones on the dartboard so your game stays versatile.
Every time you step up, check your stance and grip. Repeat the same set-up before each throw so motion becomes automatic. Over time, muscle memory replaces guesswork and scores rise.
Join a local league to test your skills under match conditions. Competition builds mental toughness faster than solo sessions. Enjoy the process—progress is steady when you stay patient and persistent.
- Daily short sessions: 30–60 minutes.
- Mix drills with games vs. different players.
- Focus on stance and grip each set.
- Vary targets to sharpen all skills.
| Focus | Time | Benefit |
|---|---|---|
| Target drills | 15–20 min | Improves precision across the board |
| Match play | 15–30 min | Builds pressure handling and game sense |
| Setup checks | 5–10 min | Locks stance and grip for consistency |
“Consistency is not one big action, but many small, repeated ones.”
Conclusion
Small habits repeated daily yield rapid gains in form, accuracy, and confidence.
Mastering your darts and refining your technique is a rewarding journey of steady practice and clear focus. Work on stance, grip, and the three-part throw with short, deliberate sessions.
Remember that every pro started as a beginner who logged hours and learned from misses. Stay patient, join local games, and push yourself with varied targets and real match pressure.
We believe the right foundation plus regular practice will lift your scores and your confidence. Thank you for following this guide — we look forward to seeing you grow and compete with more consistency.

